Tuesday, November 13, 2012

Tribal Combo Creation

One thing I've noticed over the years of doing Improvised Tribal Style (ITS) bellydance is that people love to see a great combo being performed! Maybe not just great but something they've never seen before - something unexpected and unique. Combo creation isn't always easy for everyone so here are some tips to get you started.

Find Some Inspiration:  That could be anything. Really! Maybe there’s a particular move that you really like or a move that would normally be too complicated for improv – put it into a combo! Personally, when I’m building combos it’s not always the same process. Sometimes it starts with a move I like and I build around it, or I think of a cue that would work well and I build the combo in order from beginning to end. Sometimes I even name the combo first and then put together moves that I think describe it, and sometimes I’m inspired by a certain dancer and create a combo that emulates her style.

The Cue:  Simple, simple, SIMPLE! I can’t stress this enough! Your fellow dancers will probably appreciate a cue that is obvious, unique from other moves, and lasts long enough for everyone to see it. Think about where the leader is in relation to the tribe. For example, if the leader is towards the left of the performance space then obviously the tribe can only see the right half of the leader’s body so that’s where the cue should be. Consider the other moves and combos in you repertoire. Can the cue be confused for another move?

Make Some Rules:  Boundaries for when a combo is to be used in performance make it easier for your tribe to figure out what you are going to do next. For example, if the rule is that “Combo A” always starts from an Arabic basic so when the leader starts doing Arabic basic you *know* there is a good chance she is going to do Combo A next. Maybe you have 3 or 4 combos that start in Arabic basic – through process of elimination you know there are only a few possibilities for the next move. The use of the combo can also be limited to formation - some combos look better in a circle formation, some are better in a line, etc.

Add Some Dynamics:  The main difference between creating choreography and creating combos is that you cannot get your inspiration from the song to create you tribal combo. In choreography we take advantage of musical accents, tempo changes, etc. and “letting the music tell us what to do next”, but in tribal improv you never know what music you will be dancing to. The moves you choose for your combo must be versatile enough that they can be used regardless of the music, but interesting enough that your dance does not become boring for the audience. Taking moves that you know and doing the unexpected with them will spice up your combos - here are some ideas:
-          Change the timing – slow it down or speed it up! Change the timing half way through the move! Do the move twice – once at regular speed and once double time.
-          Take it for a walk – you’d be surprised how many moves you can travel with even if it’s only one step.
-          Turns and spins – the audience loves to see dancers spin! Adding a fast turn or a series of spins will get approval from the audience. Be careful not to over use, spins can get old really fast.
-          Take it to another level – level changes are almost always unexpected and look fantastic. This is another one that should not be over used and is usually only done once or twice per song so it doesn't loose it's magic.
-          Break the rules – this is *your* combo so don’t feel obligated to use the standard arm positions, foot patterns, etc. associated with a particular movement. Try to do your own thing even if it feels weird.
-          Formations – combos are a great way to change formations without the risk of people forgetting where they are supposed to move to as well as changing leadership.

Connecting the Moves:  Because a combo is really just a series of moves, make sure each move has a logical connection to the next move. And remember: simple, simple, simple! You want all dancers to be able to follow easily and all dancers to be able to lead it.

Everything in Moderation:  Less is more! Remember that loading up your combos with level changes, spins, and shimmy's will be really cool at first but will become less impressive and predictable as the performance goes on. Make sure your combos have quiet moments so the audience can appreciate all of the really cool things you are about to do.

Got Zills?:  This is a great way to really set your combos apart from those of other tribes. Some tribes play 3’s throughout their improv and some mix it up by changing the zill pattern for certain moves. When working within a combo you can use your zills to accent certain movements or accents and use zill patterns that you would be unlikely to hear in tribal improv otherwise.

Connecting the Combos:  The glue that holds your combos together are your “filler” moves, also known as stall moves or basics. Filler moves are important because they allow “breathing room” between the combos, time for the leader to cue the next move, and allows the leader to wait for a musical phrase that would work well with the combo. Filler moves should be simple and are always the best moves to start and end a combo.

Keep it SIMPLE!:  Combos that are overly complicated or awkward to start probably won’t get used much and will eventually fall by the wayside. There’s nothing wrong with including complex moves but remember that you don’t want to make it difficult for your tribe to stay synchronized.

Don’t Get Discouraged:  Choreography and combo creation does not come easily to everyone. And let’s face it – you will probably make a few combos that end up not getting used for whatever reason. Maybe the cue is too complicated, is not easy to read, or it’s just not a favorite of the tribe. It really doesn’t matter - just try again but don't forget to take a look at your "failed" combo at another time and see if you think of a better way to cue it of exicute it.

I hope these tips are helpful! I'm also curious if you have any tips and tricks to creating your own combinations for tribal improv!

~Carla
 

Here are a few videos of Silk Sirens Tribal improvising:


Tuesday, April 3, 2012

The Bellydance Hangover

-->
Well, I’m totally exhausted and inspired from an AMAZING week in Seattle! My sister, Michelle, and I started our trip with a 14-hour drive including an audio book and lots of coffee! We left before 5am but it turned out to be a really good thing because we got to Seattle early enough to settle in to our hotel room and have a drink in the bar downstairs - they serve drinks in buckets!


Because we got to Seattle a few days before the festival we were able to be tourists before getting our butts kicked in dance workshops. :-P

We started our vacation with a trip to Pike’s Place Market where Michelle and I browsed through all kinds of unique shops, picked up a few treasures, and had lunch at a seafood restaurant overlooking the water. What we didn’t realize when we walked in is that it is the diner where Tom Hanks and Rob Reiner had lunch in the movie, “Sleepless in Seattle”. And the fish and chips were delicious!

Red placards say: "Tom Hanks sat here - Sleepless in Seattle" right; "Rob Reiner sat here - Sleepless in Seattle" left.


We had a lovely view of the harbour!

On our way out of the market we stopped at the Seattle Gum Wall and made our own contribution to it. It was pretty cool but I have to admit that I was sufficiently grossed out by the whole idea of it.

Since we were already near the water we went on the one-hour harbor cruise where we learned all about Seattle’s history, followed by a quick peek in Ye Olde Curio Shoppe where Michelle was fascinated by the real mummies, two headed cows, shrunken heads, and other gross things.


We finished off the day with a walk over to the Space Needle. Michelle went in to the outdoor observation deck but because of my fear of heights I stayed inside (the slanted walls freak me out!).


The second day was really exciting! We took in the Experience Music Project/Sci-Fi Museum where they featured a Nirvana exhibit. Since Michelle and I are pretty big fans of Nirvana (and that kind of music in general) so, of course, we ended up with a ton of pictures and spend most of the day in this part of the museum. The best part of the sci-fi part of the museum was the horror movie exhibit where they had on display weapons and props from various horror movies. They also had an Avatar exhibit but not being fans of the movie it was pretty lame.
Photo for the "Nevermind" album
"In Utero"

Kurt's sweater and guitars!


Axe from "The Shining"
"Mr. Pointy!"
Jason's mask and machete

In the evening we went on the Seattle Underworld Tour. This tour takes place underneath the sidewalks and buildings of Seattle and we learned all about Seattle’s seedy history – it was awesome! 

Cues & Tattoos Festival – the reason for our trip to Seattle – started on day 4 of our trip and my first workshop of the festival was with Carolena Nericcio of FatChance BellyDance and it was truly amazing! The focus of the workshop was on how to be an effective teacher and since I am a new teacher she answered all of the questions I’ve had swimming around in my head plus a whole lot more! After the workshop I saw Michelle coming out of her workshop with Kami Liddle - she was grinning like a lunatic and practically bouncing down the hallway! 

"Me with Adrienne and "Jack" of Troupe Hipnotica
My next workshop was with Troupe Hipnotica (the fantastic ladies who organize the whole event!) and they were a lot of fun! We learned some fantastic new formations designed for larger groups that I can’t wait to do with Silk Sirens Tribal and our tribal students!


In the evening was the Instructor Showcase where we were treated to solos and group performances from all of the instructors at the festival. I could not take pictures but I did take a few short videos on my phone. :-P


The second day of the festival was an exhausting one. I’m not sure why, but I thought it would be a good idea to take as many classes as my schedule would allow and not schedule any breaks for myself. So I drilled with Kami Liddle, then drilled some more with Lava (which included a lot of planking and hopping up and down), then more dancing with TribalTique. It was completely exhausting but I learned so much! So by the end of the day my body is aching, I’m dehydrated, and my thighs feel like jello – did I mention the elevator was broken so we had to walk up 4 flights of stairs to get to our classes?

In the evening we were finally able to relax, watch the student showcase, and shop – the vendors were awesome this year and I got a bunch of new jewelry.

Sunday I had only one class but I think it was the perfect way to end the festival for me. I learned the Moroccan Guedra blessing ritual with Kajira – so much fun, and Kajira really did a wonderful job of facilitating a positive and supportive environment for us to be a little bit vulnerable. <3  

Michelle and I did some last minute shopping, watched the rest of the student performances, and hauled our tired bodies to the car for our looooong trip home. 


While we were away I missed my husband and my cats terribly but I'm feeling so inspired and happy about everything I learned and about seeing old and new friends. Overall this was amazing and I’m so happy that I was able to share this experience with my sister and troupe mate. <3 I can't wait for next year!!!

Sunday, January 8, 2012

Tribal Bra Tutorial – by Hanaan Tribal (Carla Young)

Dedicated to ladies who are a bit more on the "boobalicious" side!
The following is a step by step tutorial on how to cover a bellydance bra made especially for those who are a little curvier. The method of covering a larger cup really is not that much different than a smaller one, but it can be a bit trickier. There are several ways to cover a bra but this is the way I find works for me. This method can also be used for any type of bellydance/dance bra, not just tribal bellydance.

The fabric covering a costume bra is the one detail that turns an ordinary bra into a stunning professional costume piece. If there is any original part of the bra showing (sides, straps, etc.) it becomes really obvious on stage as soon as the light hits the lycra that you are wearing decorated lingerie – and we want to be on stage in dance costumes, not undergarments. Even a black bra with decorated cups fools no one.


1.   First you will need to find a sturdy bra with foam cups, under wire, and preferably has a lot of coverage – convertible bras work great but any foam cups can be trimmed and shaped with scissors. If you are a C cup or larger I would strongly recommend using a bra with a middle piece that is really substantial otherwise the bra may not be supportive enough causing some "gaping" on the top. You will need to cut off the straps at the top where they meet the cup and cut the band approximately where the strap is attached at the back.

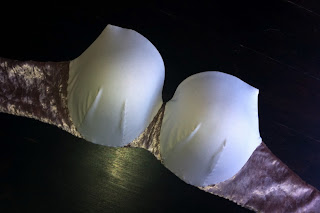
2.   Cover the sides of the bra. Starting close to the middle of the cup, line up the straight edge of your fabric along the bottom of the bra and pin in place so there is a 1cm overlap along the bottom. When the bottom is secure, carefully fold the fabric over the top and pin along the top – make sure the original bra is lying perfectly flat so it doesn’t end up twisted or crumpled inside its fabric covering.

3.   Secure the fabric (that you just folded over the top) to the bottom so both the inside and outside of the band is completely covered. I usually re-pin it to the bottom (from step 2). Also, on the front side it helps to cut a few slits in the fabric so it’s easier to wrap around the curves of the bra.

4,   On both the inside of the bra AND the outside, attach a few pins to the under wire casing. This will ensure that as you continue working on the bra the fabric stays in place without shifting or wrinkling, giving the end product a more polished look.

5.   Use a small scrap of fabric to cover the triangle piece in the middle. Make sure it is long enough to wrap over the top of the center bit and underneath the bra.

6.   Trim off any excess fabric. I usually leave 1cm around the cups and no excess along the bottom (because there is already overlap underneath from step 3).

7.   Along the inside of the bra whip-stitch (or spiral stitch) the fabric on the top and bottom of the triangle part and where the sides attach to the cups. I like to sew the fabric directly to the under wire casing to give it a cleaner line. Along the bottom of the bands whip-stitch  the fabric together making sure to grab a bit of both halves of the fabric as well as a bit of the elastic on the bottom of the bra. On the outside of the bra, sew the sides and middle part directly on to the cups (just past the under wire) using a basting stitch. 


8.   Place the fabric on both cups and add a few pins to anchor. I usually put one on the top, one on the bottom, and one on either side. For a larger cup stretch the fabric slightly when placing the pins on the sides. Arrange the fabric along the top first and pin in place. Next, pin the sides and add pleats near the bottom. You will probably need to make 2 pleats but that may depend on the size of the cup and the type of fabric you are using. Also, be careful not to stretch the fabric too much because it will distort the shape of the cup.
9.   Trim off excess fabric leaving approximately 1cm and stitch the fabric along the top of each cup on the inside of the bra.

10.   Along the pleats, use and “invisible” stitch to smooth out the pleats. At this point you can flip up the fabric on the cups to trim the excess fabric on the underside of the pleat. – Trimming the fabric under the pleats is optional and probably won’t show anyways if you are using velvet or heavier fabrics. If you are using a heavier fabric you can do the invisible stitch on the pleats after you stitch around the cup.

11.   Stitch around the outside of the cup folding the fabric under as you go. Stitch directly on the under wire casing to get a clean line. Don’t worry if there are a few wrinkles in the fabric, once you put the bra on it will be smooth – pulling the fabric more to smooth out these wrinkles can make the fabric too tight and distort the cups.

12.   Finish the band by adding D-rings or O-rings to the end of each side. I’ve finished the ends with a serger, then folded the band through and stitched in place. The band will be tied in the back by tying lace and fabric pieces through the D-rings.

13.   This is the point where you would begin to add embellishments to your bra. Make sure you use good quality thread when stitching on anything heavy or that will move while you dance and pin everything in place before sewing. I’ve added a few metal pieces and a second layer of fabric (which I’ve sewed on to the cup exactly the same way I did the first layer). Note: If you are covering your cups with more than one fabric you can sew them both on at the same time, I’ve sewn them separately because I wanted the pattern to end up in a specific place.

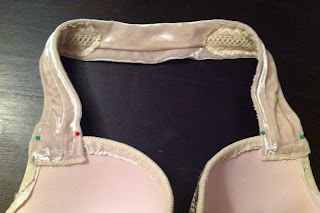
14.   Lastly sew a tube of fabric for the neck strap. The larger the cup size the wider the strap should be otherwise it will dig into your skin. Also, the neck strap should not be too stretchy otherwise the bra may not be supportive enough (depending on the amount of decoration to the cups, the heavier the cups the more sturdy your strap should be). Pin the strap to the inside of the bra cup, try it on to make sure it is the right length, and stitch in place. Tip: Although I used stretchy fabric for the neck strap I put a strip of wide twill tape inside to prevent it from stretching. You could also use wide elastic in the fabric tube as well if  you want more stretch. I’ve also sewn some lace on to the front of this one, which also helps to make it less stretchy.


Tips & Tricks
  • When choosing a bra make sure you have one that is slightly bigger than what you would normally wear.
  • When you are covering the cups it’s best to do both cups simultaneously so they look the same when you’re finished – especially if your fabric has a pattern. Covering the cups can also be frustrating but it’s not unusual to end up re-pinning your fabric several times to get them just right.
  • Your choice of fabric type is very, very important. You want to make sure you are using stretchy fabric (2-way or 4-way) to cover your bra - this goes for both the band and the cups. I also don't recommend fabric with stripes (good luck getting both sides to look the same!) or any kind of thick fabric such as a brocade, denim, etc. because unless you are an expert at covering a bra you will probably end up with misshapen bra cups with bulky seams. If you are using a non stretchy fabric it will help to work with the fabric on the bias to make it stretch a little bit.
  • When decorating the cups make sure you do both cups at the same time just as you did when you covered them with fabric. Do not decorate one cup then the other; they will not look the same. And make sure you pin all of your decorations on the cups before sewing so you can get the placement just right.
  • When stitching your bra use shorter sections of thread rather than a few longer pieces; if you break a thread you will have less to fix. This applies to decorating as well as covering. For heavier decorations and pendants each should be sewn on individually; additionally if you are sewing heavy decorations you can put a button on the back side of the fabric (so the fabric would be sandwiched between the decoration and a button) to ensure that the decoration won’t pull through the fabric.
  • Variations on the band – you do not have to use D-rings like I have, you could also extend the straps so that you can tie them together or replace the original hooks with sturdier ones.
  • Variations on the straps – rather than using one strap around the neck like I did you could add a longer strap to the top of each cup that could be tied at the back of your neck (although a lot of people find the knot to be uncomfortable), or if you attach really long ties you can criss-cross them at the back by looping them through the D-rings.
  • You can add extra support by wearing a regular bra underneath your dance bra if your costume allows. If you are wearing your dance bra with a choli or gypsy top you will have no problem wearing a regular bra with your costume and it probably won’t show. If you cannot wear a second bra with your bra top but need more support you can sew a second bra to the inside of your dance bra (I usually cut up an old bra for this).
  • Since you can’t really wash a costume bra, stitch a cotton lining to the inside of your bra so that you can replace it once in a while.
  • If you aren't up to covering your bra, find someone else to do it for you! There are always people online who sell covered bra bases to decorate yourself, or you can often send your own bra to someone who will cover it for you. And don't forget to ask your local dancers, there is always someone out there willing to help or do it for you (for a fee). It's well worth it!  :-)