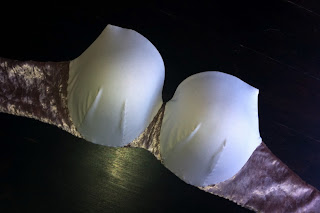
The following is a step by step tutorial on how to cover a bellydance bra made especially for those who are a little curvier. The method of covering a larger cup really is not that much different than a smaller one, but it can be a bit trickier. There are several ways to cover a bra but this is the way I find works for me. This method can also be used for any type of bellydance/dance bra, not just tribal bellydance.
The fabric covering a costume bra is the one detail that turns an ordinary bra into a stunning professional costume piece. If there is any original part of the bra showing (sides, straps, etc.) it becomes really obvious on stage as soon as the light hits the lycra that you are wearing decorated lingerie – and we want to be on stage in dance costumes, not undergarments. Even a black bra with decorated cups fools no one.
1. First you will need to find a sturdy bra with foam cups, under wire, and preferably has a lot of coverage – convertible bras work great but any foam cups can be trimmed and shaped with scissors. If you are a C cup or larger I would strongly recommend using a bra with a middle piece that is really substantial otherwise the bra may not be supportive enough causing some "gaping" on the top. You will need to cut off the straps at the top where they meet the cup and cut the band approximately where the strap is attached at the back.
2. Cover the sides of the bra. Starting close to the middle of the cup, line up the straight edge of your fabric along the bottom of the bra and pin in place so there is a 1cm overlap along the bottom. When the bottom is secure, carefully fold the fabric over the top and pin along the top – make sure the original bra is lying perfectly flat so it doesn’t end up twisted or crumpled inside its fabric covering.
3. Secure the fabric (that you just folded over the top) to the bottom so both the inside and outside of the band is completely covered. I usually re-pin it to the bottom (from step 2). Also, on the front side it helps to cut a few slits in the fabric so it’s easier to wrap around the curves of the bra.
4, On both the inside of the bra AND the outside, attach a few pins to the under wire casing. This will ensure that as you continue working on the bra the fabric stays in place without shifting or wrinkling, giving the end product a more polished look.
5. Use a small scrap of fabric to cover the triangle piece in the middle. Make sure it is long enough to wrap over the top of the center bit and underneath the bra.
6. Trim off any excess fabric. I usually leave 1cm around the cups and no excess along the bottom (because there is already overlap underneath from step 3).
7. Along the inside of the bra whip-stitch (or spiral stitch) the fabric on the top and bottom of the triangle part and where the sides attach to the cups. I like to sew the fabric directly to the under wire casing to give it a cleaner line. Along the bottom of the bands whip-stitch the fabric together making sure to grab a bit of both halves of the fabric as well as a bit of the elastic on the bottom of the bra. On the outside of the bra, sew the sides and middle part directly on to the cups (just past the under wire) using a basting stitch.
8. Place the fabric on both cups and add a few pins to anchor. I usually put one on the top, one on the bottom, and one on either side. For a larger cup stretch the fabric slightly when placing the pins on the sides. Arrange the fabric along the top first and pin in place. Next, pin the sides and add pleats near the bottom. You will probably need to make 2 pleats but that may depend on the size of the cup and the type of fabric you are using. Also, be careful not to stretch the fabric too much because it will distort the shape of the cup.
9. Trim off excess fabric leaving approximately 1cm and stitch the fabric along the top of each cup on the inside of the bra.
10. Along the pleats, use and “invisible” stitch to smooth out the pleats. At this point you can flip up the fabric on the cups to trim the excess fabric on the underside of the pleat. – Trimming the fabric under the pleats is optional and probably won’t show anyways if you are using velvet or heavier fabrics. If you are using a heavier fabric you can do the invisible stitch on the pleats after you stitch around the cup.
11. Stitch around the outside of the cup folding the fabric under as you go. Stitch directly on the under wire casing to get a clean line. Don’t worry if there are a few wrinkles in the fabric, once you put the bra on it will be smooth – pulling the fabric more to smooth out these wrinkles can make the fabric too tight and distort the cups.
12. Finish the band by adding D-rings or O-rings to the end of each side. I’ve finished the ends with a serger, then folded the band through and stitched in place. The band will be tied in the back by tying lace and fabric pieces through the D-rings.
13. This is the point where you would begin to add embellishments to your bra. Make sure you use good quality thread when stitching on anything heavy or that will move while you dance and pin everything in place before sewing. I’ve added a few metal pieces and a second layer of fabric (which I’ve sewed on to the cup exactly the same way I did the first layer). Note: If you are covering your cups with more than one fabric you can sew them both on at the same time, I’ve sewn them separately because I wanted the pattern to end up in a specific place.
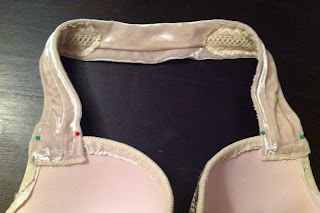
14. Lastly sew a tube of fabric for the neck strap. The larger the cup size the wider the strap should be otherwise it will dig into your skin. Also, the neck strap should not be too stretchy otherwise the bra may not be supportive enough (depending on the amount of decoration to the cups, the heavier the cups the more sturdy your strap should be). Pin the strap to the inside of the bra cup, try it on to make sure it is the right length, and stitch in place. Tip: Although I used stretchy fabric for the neck strap I put a strip of wide twill tape inside to prevent it from stretching. You could also use wide elastic in the fabric tube as well if you want more stretch. I’ve also sewn some lace on to the front of this one, which also helps to make it less stretchy.
Tips & Tricks
- When choosing a bra make sure you have one that is slightly bigger than what you would normally wear.
- When you are covering the cups it’s best to do both cups simultaneously so they look the same when you’re finished – especially if your fabric has a pattern. Covering the cups can also be frustrating but it’s not unusual to end up re-pinning your fabric several times to get them just right.
- Your choice of fabric type is very, very important. You want to make sure you are using stretchy fabric (2-way or 4-way) to cover your bra - this goes for both the band and the cups. I also don't recommend fabric with stripes (good luck getting both sides to look the same!) or any kind of thick fabric such as a brocade, denim, etc. because unless you are an expert at covering a bra you will probably end up with misshapen bra cups with bulky seams. If you are using a non stretchy fabric it will help to work with the fabric on the bias to make it stretch a little bit.
- When decorating the cups make sure you do both cups at the same time just as you did when you covered them with fabric. Do not decorate one cup then the other; they will not look the same. And make sure you pin all of your decorations on the cups before sewing so you can get the placement just right.
- When stitching your bra use shorter sections of thread rather than a few longer pieces; if you break a thread you will have less to fix. This applies to decorating as well as covering. For heavier decorations and pendants each should be sewn on individually; additionally if you are sewing heavy decorations you can put a button on the back side of the fabric (so the fabric would be sandwiched between the decoration and a button) to ensure that the decoration won’t pull through the fabric.
- Variations on the band – you do not have to use D-rings like I have, you could also extend the straps so that you can tie them together or replace the original hooks with sturdier ones.
- Variations on the straps – rather than using one strap around the neck like I did you could add a longer strap to the top of each cup that could be tied at the back of your neck (although a lot of people find the knot to be uncomfortable), or if you attach really long ties you can criss-cross them at the back by looping them through the D-rings.
- You can add extra support by wearing a regular bra underneath your dance bra if your costume allows. If you are wearing your dance bra with a choli or gypsy top you will have no problem wearing a regular bra with your costume and it probably won’t show. If you cannot wear a second bra with your bra top but need more support you can sew a second bra to the inside of your dance bra (I usually cut up an old bra for this).
- Since you can’t really wash a costume bra, stitch a cotton lining to the inside of your bra so that you can replace it once in a while.
- If you aren't up to covering your bra, find someone else to do it for you! There are always people online who sell covered bra bases to decorate yourself, or you can often send your own bra to someone who will cover it for you. And don't forget to ask your local dancers, there is always someone out there willing to help or do it for you (for a fee). It's well worth it! :-)


Great tutorial...thsnk you so much for posting this!
ReplyDeleteThank you so much for the information and tips!
ReplyDelete